CLEAN. SAFE. PROFESSIONAL

Where safe piercing starts…..
Asepsis, Sterile Fields & Gloves
Why we do what we do

In order to ensure safety during your piercing procedure, we must keep in mind the basic information of the daily tasks that we perform which truly make a difference. One such basic but extremely important task in this setting is maintaining asepsis within a sterile field.
Asepsis is the state of being free from disease-causing micro-organisms (such as pathogenic bacteria, viruses, pathogenic fungi, and parasites).
A sterile field is an area kept free of microorganisms to protect the health and safety of a client during a piercing procedure. Maintaining aseptic conditions is critical for piercing safety, as an infection could be very dangerous. Professional body piercers learn how to create and maintain a safe environment during their training.
Sterile fields can include people and tools, all of which are aseptic. The process of creating such a field starts with the piercing room, which should be kept in very clean condition.
Sterile gloves (surgical gloves) are deemed sterile because they have been sterilized according to FDA standards. They are individually packaged as pairs in sterile packages and sterilized by radiation. The gloves will remain sterile until the package is opened or damaged.
Because non-sterile gloves have been found to pose no higher risk of infection for non-piercing procedures when compared with sterile gloves, non-sterile gloves are used for the majority of procedures that are considered non-piercing.
We will always utilize NON-Latex gloves for all procedures, piercing or otherwise.
State-of-the-art Sterilization Equipment

SciCan are the infection control specialist. Providing our industry with the most effective sterilization equipment for over 20 years. Much of what SciCan designs, builds, distributes, and maintains is focused on efficiently washing, disinfecting, and sterilizing medical instruments.
They are known as the maker of the STATIM Cassette Autoclave®. It’s the fastest cassette autoclave out there. We utilize the Statim 2000. It will sterilize quickly and efficiently in 6 mins flat.
Monitoring & Lab Tests
Spore Tests, Integrators & Indicators

An autoclave spore test is a very unique test that is mainly used in determining the efficiency of autoclaves. This is a weekly test. The results of this will show if the equipment may be faulty thus malfunctioning. Autoclave sterilization has been identified to be a very effective way of treating medical instruments against infections from dangerous micro-organisms such as bacteria and viruses among other micro-organisms.
However, there are times when an autoclave may malfunction or even perform sub-optimally thereby resulting in partial or no sterilization at all. The spore test mainly assesses the autoclaves’ efficiency in destroying dangerous microorganisms. In North America, spore testing is the most common way of ensuring that an autoclave is working. In short, it works by running a package of living spores through an autoclave.
A Type 5 integrator is designed to mimic the ability of a biological indicator at 3 separate and distinct points: time, temperature, and saturated steam. According to the infection control experts at SciCan, Type 5 integrators are the most accurate of all chemical indicators and contain a chemical ink, which reacts to all 3 sterilization parameters.
4 Chemical Indicator can be used to determine whether all critical parameters, time, temperature and saturation of steam. Twindicator indicators have an off-white to dark brown/black color change after exposure to an effective steam cycle.
We include both in every set-up for each client.
Materials
Styles & Standards

All jewelry used for initial piercing should be internally threaded or press-fit, having internal tapping (no threads on the exterior of posts and barbells). You want your jewelry to be ASTM complaint to ensure a safe and easy healing process.
Quality body jewelry will be implant grade and made from materials such as
If it’s externally threaded there’s an extremely high possibility that the jewelry is low quality and should be assessed and changed out.
You want to avoid organic materials such as woods and stones for initial piercings or when stretching your healed body piercing. They are porous and can cause tearing, excess bleeding, scarring, and dreaded blow-outs.
We strongly recommend you avoid plastic and acrylic jewelry. Not only are they porous and cause the same damages as organic material, it can happen at any stage of having your piercing. New or old. Clients tend to see immediate reactions to wearing plastics and acrylics.
Metal Quality
More than meets the eye

Although implant standards address bio-compatibility of a given material when used for surgical implants, they may not always be directly applied to the use or required finish for body jewelry. Separate standards are required for surface finish. Healing piercings form tissue against the smooth non-adhesive surface of the jewelry, and this jewelry can be changed when appropriate.
Metals must have a consistent mirror finish on surfaces that frequently come in contact with your tissue. You want the surfaces and ends to be smooth and free of nicks, scratches, burrs, stamps, hallmarks, polishing compounds, and other potentially harmful residues. If it looks like it would be uncomfortable, it’s because it will be. Smooth=Comfortable
.
Recognizing the signs of low quality jewelry can save you
a headache, a hospital visit and money in your wallet.
Avoid The Gun!
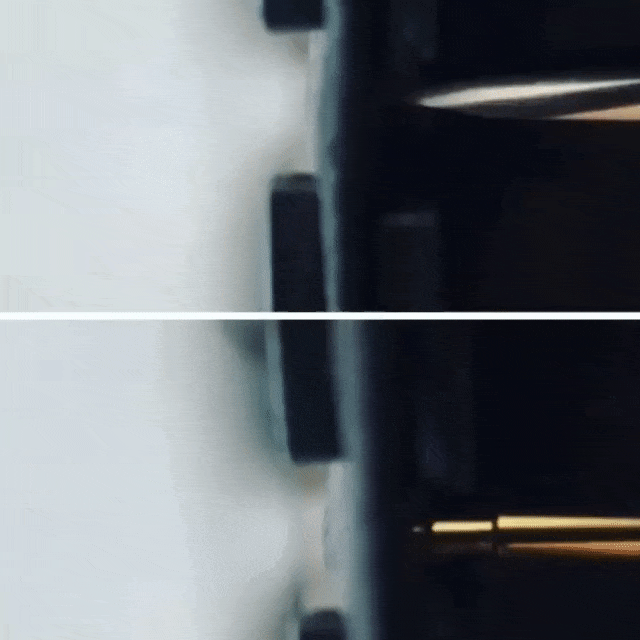
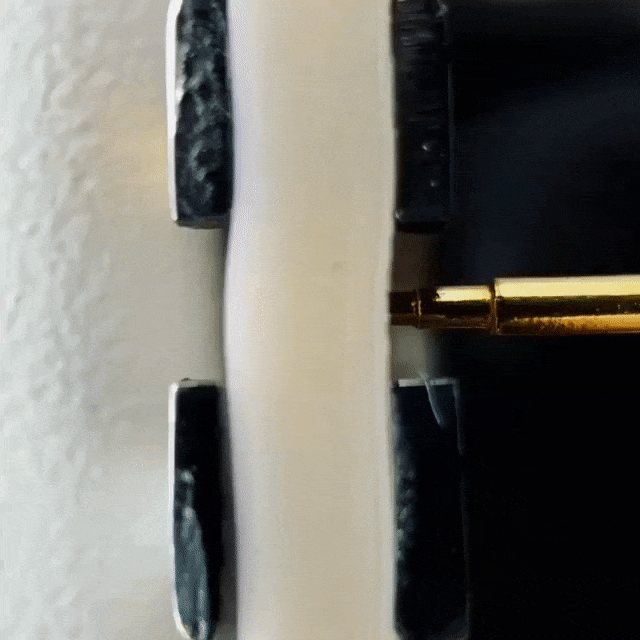
Demonstration courtesy of @dani_medvedev
A demonstration between the precision of a body piercing needle designed to make a clean and accurate puncture vs the slow drag and forceful ripping caused by a "piercing" stud and "gun" mechanism. You can see how the “piercing” stud breaks through, removing and displacing the “tissue”.
Both images show the same material, the same support to the area, as well as the same speed and pressure. The whole process takes around 10 secs to film, the needle exits in 2 secs, while the “piercing” stud takes 8 secs. You’ll notice by the time the “piercing’ stud has made it’s way through, the needle has been long finished.
The second demonstration shows the slow drag and forceful ripping a "piercing" stud and "gun" mechanism has on simulated cartilage tissue. Notice the jagged exit. This requires the piercing to take 2-3 times longer to heal, as well as creating shattered cartilage.
In both instances, you get prolonged heal times, excess bleeding, scarring, needless amount of inflammation, metals of low quality and standards and in some cases infection. With all of these cons already, a good portion of people retire their “gun” piercings simply because the piercings were placed unevenly due to improper training. .